
Introduction to Android Google Maps V2
Android allows us to integrate google maps in our application. You can show any location on the map , or can show different routes on the map e.t.c. You can also customize the map according to your choices.
Prerequisites
Example
Today we are going to integrate google map in android. The things that we are going to cover are:
- Displaying google map.
- Showing User Current Location on Map.
- Showing different type of maps.
- Working on My Location Button and Blue dot.
- Showing Default Marker as well as custom marker with Camera Animation.
- Updating marker position on location changed by using Location Update method.
- Google Map UI Settings and Gestures Functionality.
- Handling Google API Client Call back methods.
- Handling Marker Click event.
- Hiding Navigation and GPS pointer which appears on clicking of marker i.e. Map Toolbar.
VIDEO DEMO
So Lets start playing with Google Maps,
Create Project in Android Studio
Firstly, create new project in Android Studio naming anything whatever you want.
Getting Google Maps API Key
1. Now login into your Gmail Account and go to Google API Console.
2. Click on Create New Project.

3. Enter your project name and click create.

4. Creating project will take some couple of minutes you can check the processing of your project top and bottom of page.


5. After successful creation of your project the below is the first screen you get.

6. You can check your dashboard by clicking Dashboard from side menu. Currently, it is empty, when we integrate and test the app then analytics will show here.

7. Now for Integration we need API Key so for this click over Credentials from side menu and you will get Credential Screen

From the dropdown menu select API Key and on selection of API key a new popup will appear that ask you platform type, select android from it.

8. Now another Screen will open here you have to give package name and fingerprint (optional) but it is good to put package name and fingerprint.

Getting Certificate Fingerprint
There are two ways of getting fingerprint:
From Terminal or CMD
1. Locate your debug keystore file. The file name is debug.keystore, and is created the first time you build your project. By default, it is stored in the same directory as your Android Virtual Device (AVD) files:
- macOS and Linux:
~/.android/ - Windows Vista and Windows 7:
C:\Users\your_user_name\.android\
2. List the SHA-1 fingerprint:
- For Linux or macOS, open a terminal window and enter the following:
|
1 |
keytool -list -v -keystore ~/.android/debug.keystore -alias androiddebugkey -storepass android -keypass android |
- For Windows Vista and Windows 7, run:
|
1 |
keytool -list -v -keystore "%USERPROFILE%\.android\debug.keystore" -alias androiddebugkey -storepass android -keypass android |
You should see output similar to this:
|
1 2 3 4 5 6 7 8 9 10 11 12 13 14 15 |
Alias name: androiddebugkey Creation date: 5 Jun, 2016 Entry type: PrivateKeyEntry Certificate chain length: 1 Certificate[1]: Owner: C=US, O=Android, CN=Android Debug Issuer: C=US, O=Android, CN=Android Debug Serial number: 1 Valid from: Sun Jun 05 16:58:31 IST 2016 until: Tue May 29 16:58:31 IST 2046 Certificate fingerprints: MD5: DE:DC:D0:74:0E:40:50:D8:79:71:4D:10:42:89:C4:0A SHA1: 96:77:03:77:0E:46:5B:18:90:49:E2:3B:19:AB:9C:70:F3:2A:44:A8 SHA256: F9:B1:CC:7F:94:FA:A6:2D:DD:11:57:7F:F3:71:0A:15:30:16:91:BF:18:0F:84:C1:67:3E:4E:6E:77:60:02:BC Signature algorithm name: SHA1withRSA Version: 1 |
The line that begins with SHA1 contains the certificate’s SHA-1 fingerprint. The fingerprint is the sequence of 20 two-digit hexadecimal numbers separated by colons.

From Gradle
1. Click on Gradle (From Right Side Panel, you will see Gradle Bar).
2. Click on Refresh (Click on Refresh from Gradle Bar, you will see List Gradle scripts of your Project).

3. Click on Your Project (Your Project Name form List (root)) -> Tasks -> android -> signingReport (double click).

4. You will get SHA1 and MD5 in Run Bar.

Now Copy your SHA1 fingerprint.
Back to Google API Console
9. Now enter your package name and copied SHA1 fingerprint in respective text fields.

After adding click create.
10. A popup will open containing your API Key copy that API key and keep if safe with you and don’t disclose with anyone.

You can also delete and regenerate to existing API key.
11. Now go back to Library menu and click Google Maps Android API under Google Maps APIs category and click enable to enable Google Map API

Now all done from Google API Console side come back to Android Studio.
Adding Google Play Services
Before doing anything firstly you need Google Play Services to deal with Google Maps. Follow below steps:
1. For this you have to go to Project Module Setting -> Dependency.


2. Click + button and select Library Dependency.

3. Now new screen will open from this select com.google.android.gms:play-services-maps and click Ok and you can see that it will added to you existing dependency.

4. Now to add it to your grade file click OK again and wait for sometime.
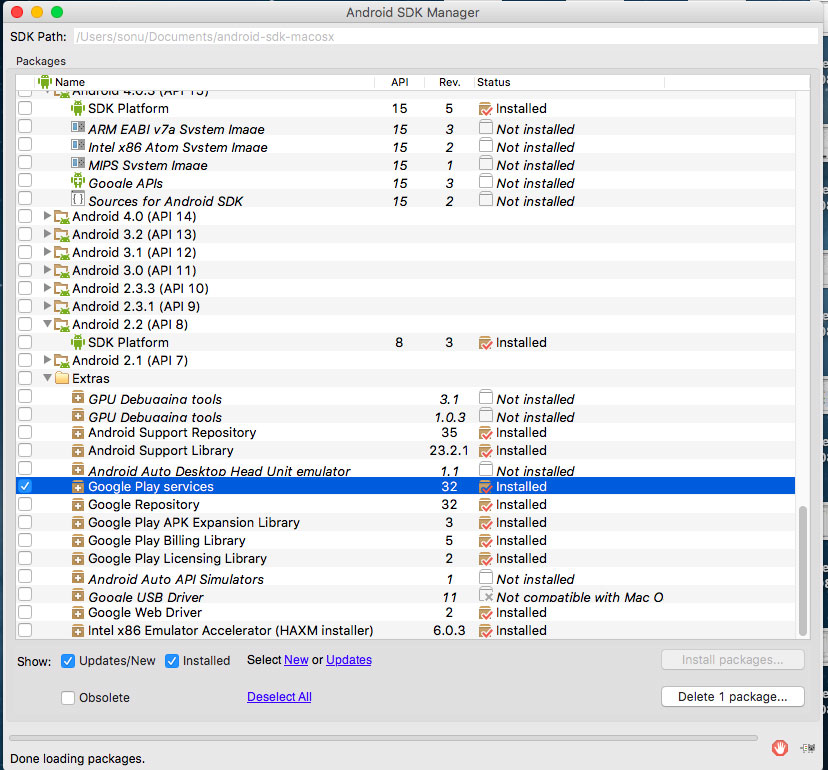
5. If you are not able to find Play Services then open you SDK manager and install library form it.
6. You can check your added Play Services dependency in build.gradle file.
|
1 |
compile 'com.google.android.gms:play-services-maps:9.4.0' |
7. Open your AndroidManifest.xml and the following element as a child of the <application> element, by inserting it just before the closing </application> tag:
|
1 2 3 |
<meta-data android:name="com.google.android.gms.version" android:value="@integer/google_play_services_version" /> |
Add the API key to your application
Now open your AndroidManifest.xml and the following element as a child of the <application> element, by inserting it just before the closing </application> tag:
|
1 2 3 |
<meta-data android:name="com.google.android.maps.v2.API_KEY" android:value="@string/google_map_api_key" /> |
Substitute your API key for google_map_api_key in the value attribute. This element sets the key com.google.android.maps.v2.API_KEY to the value of your API key.
Permission and Features Required For Google Map
Add the below permission and features to your AndroidManifest.xml.
|
1 2 3 4 5 6 7 8 9 10 11 12 13 |
<permission android:name="com.googlemap_demo.permission.MAPS_RECEIVE" android:protectionLevel="signature" /> <uses-permission android:name="android.permission.ACCESS_COARSE_LOCATION" /> <uses-permission android:name="android.permission.ACCESS_FINE_LOCATION" /> <uses-permission android:name="android.permission.INTERNET" /> <uses-permission android:name="com.google.android.providers.gsf.permission.READ_GSERVICES" /> <!-- Required OpenGL ES 2.0. for Maps V2 --> <uses-feature android:glEsVersion="0x00020000" android:required="false" /> |
Add a Fragment
Add a <fragment> element to the activity’s layout file to define a Fragment object. In this element, set the android:name attribute to "com.google.android.gms.maps.SupportMapFragment". This automatically attaches a SupportMapFragment to the activity.
The following layout file contains a <fragment> element:
|
1 2 3 4 5 6 |
<!-- Google Map Use Support Map Fragment class to Support all Devices else use MapFragment --> <fragment android:id="@+id/map" android:name="com.google.android.gms.maps.SupportMapFragment" android:layout_width="match_parent" android:layout_height="match_parent" /> |
Add Map Code
To work with the map inside your app, you’ll need to implement the OnMapReadyCallback interface and set an instance of the callback on a SupportMapFragment . This tutorial uses a SupportMapFragment, because that’s the most common way of adding a map to an app. The first step is to implement the callback interface:
|
1 2 3 4 5 6 7 |
public class MainActivity extends AppCompatActivity implements OnMapReadyCallback { ... } |
Now find the ID of the SupportMapFragment by using getSupportFragmentManager() and then use getMapAsync() to set the callback on the fragment.
|
1 2 3 4 5 6 7 |
/* Set Up google map if Google Play Services Exists */ private void setUpGoogleMap() { if (new GooglePlayServiceCheck().isGooglePlayInstalled(MainActivity.this)) { SupportMapFragment map = ((SupportMapFragment) getSupportFragmentManager().findFragmentById(R.id.map)); map.getMapAsync(this);//after getting map call async method, this method will call onMapReady(GoogleMap map) method } } |
Call the above method on your activity OnCreate method
Note: getMapAsync() must be called from the main thread, and the callback will be executed in the main thread. If Google Play services is not installed on the user’s device, the callback will not be triggered until the user installs Play services.So we are checking if PlayServices are installed or not.
Use the onMapReady(GoogleMap) callback method to get a handle to the GoogleMap object. The callback is triggered when the map is ready to be used. It provides a non-null instance of GoogleMap. You can use the GoogleMap object to set the view options for the map or add a marker, for example.
|
1 2 3 4 5 |
@Override public void onMapReady(GoogleMap map) { //When map ready googleMap = map; } |
Map Types
There are many types of maps available within the Google Maps Android API. For example, an atlas usually contains political maps that focus on showing boundaries, and road maps that show all of the roads for a city or region.
The Google Maps Android API offers four types of maps, as well as an option to have no map at all:
1. Normal
Typical road map. Roads, some man-made features, and important natural features such as rivers are shown. Road and feature labels are also visible.

2. Hybrid
Satellite photograph data with road maps added. Road and feature labels are also visible.

3. Satellite
Satellite photograph data. Road and feature labels are not visible.

4. Terrain
Topographic data. The map includes colors, contour lines and labels, and perspective shading. Some roads and labels are also visible.

5. None
No tiles. The map will be rendered as an empty grid with no tiles loaded.

To set the type of a map, call the GoogleMap object’s setMapType() method, passing one of the type constants defined in GoogleMap. For example, to display a hybrid map:
|
1 |
googleMap.setMapType(GoogleMap.MAP_TYPE_HYBRID); |
Adding Marker
You can add a marker on the map by using following code:
|
1 2 3 4 |
double lat = latitude here; double lng = longitude here; googleMap.addMarker(new MarkerOptions().position(new LatLng(lat,lng)) .title("You are here")); |
Changing Marker Color
By default map marker color will be RED. Google maps provides some set of predefined colored icons for the marker.
|
1 2 3 |
mMarker.setIcon(BitmapDescriptorFactory.defaultMarker(BitmapDescriptorFactory.HUE_CYAN));//Cyan Marker mMarker.setIcon(BitmapDescriptorFactory.defaultMarker(BitmapDescriptorFactory.HUE_BLUE));//Blue Marker mMarker.setIcon(BitmapDescriptorFactory.defaultMarker(BitmapDescriptorFactory.HUE_GREEN));//Green marker |
Custom Marker Color
Apart from maps native marker icons, you can use own image to show as a marker. You can load the icon from any kind of supported sources.
- fromAsset(String assetName) – Loading from assets folder.
- fromBitmap (Bitmap image) – Loading bitmap image.
- fromFile (String path) – Loading from file.
- fromResource (int resourceId) – Loading from drawable resource.
Below I loaded a custom marker icon from drawable folder
|
1 |
mMarker.setIcon(BitmapDescriptorFactory.fromResource(R.drawable.ic_user_location)); |
Moving Camera to a Location with Animation
You may want to move camera to a particular position. Google maps provides set of functions to achieve this.
|
1 |
googleMap.animateCamera(CameraUpdateFactory.newLatLngZoom(latLng, 17.0f)); |
UI Controls
The Maps API offers built-in UI controls that are similar to those found in the Google Maps application on your Android phone. You can toggle the visibility of these controls using the UiSettings class which can be obtained from aGoogleMap with the GoogleMap.getUiSettings method.
1. Zoom Controls
You can call setZoomControlsEnabled(boolean) function to get rid of those zooming controls on the map. By disabling these buttons map zooming functionality still work by pinching gesture.
|
1 |
googleMap.getUiSettings().setZoomControlsEnabled(true); |
2. Compass
Compass can be disabled by calling setCompassEnabled(boolean) function.
|
1 |
googleMap.getUiSettings().setCompassEnabled(true); |
3. My Location Button
My location button will be used to move map to your current location. This button can be shown / hidden by calling setMyLocationButtonEnabled(boolean) function.
|
1 |
googleMap.getUiSettings().setMyLocationButtonEnabled(true); |

Map Gestures
1. Rotate Gestures
My rotate gesture can be enabled or disabled by calling setRotateGesturesEnabled(boolean) method.
|
1 |
googleMap.getUiSettings().setRotateGesturesEnabled(true); |
2. Zoom Gestures
You can disable zooming gesture functionality by calling setZoomGesturesEnabled(boolean).
|
1 |
googleMap.getUiSettings().setZoomGesturesEnabled(true); |
3. Tilt Gestures
A user can tilt the map by placing two fingers on the map and moving them down or up together to increase or decrease the tilt angle respectively. You can disable tilt gestures by calling setTiltGesturesEnabled(boolean).
|
1 |
googleMap.getUiSettings().setTiltGesturesEnabled(true); |
4. Pan/Scroll Gestures
A user can scroll (pan) around the map by dragging the map with their finger. You can disable scrolling by calling setScrollGesturesEnabled(boolean).
|
1 |
googleMap.getUiSettings().setScrollGesturesEnabled(true); |
Map toolbar
By default, a toolbar appears at the bottom right of the map when a user taps a marker. The toolbar gives the user quick access to the Google Maps mobile app. You can enable and disable the toolbar by calling setMapToolbarEnabled(boolean).
|
1 |
googleMap.getUiSettings().setMapToolbarEnabled(true); |


Showing Blue Dot
You can show user’s current location on the map by calling setMyLocationEnabled(). Pass true / false to enable or disable this feature.
|
1 |
googleMap.setMyLocationEnabled(true); |
Handling Marker Click Event
1. For handling marker click event implement GoogleMap.OnMarkerClickListener to your activity.
2. Now inside onMapReady method set marker click event over google map.
|
1 |
googleMap.setOnMarkerClickListener(this); |
3. The below method is used to handle marker click event, here you will get marker instance to do your stuff.
|
1 2 3 4 5 |
@Override public boolean onMarkerClick(Marker marker) { Log.e(TAG, "Marker Click: " + marker.getTitle() + "\nLocation : " + marker.getPosition()); return false; } |
Handling MyLocationButton Click Event
1. For handling marker click event implement GoogleMap.OnMyLocationButtonClickListener to your activity.
2. Now inside onMapReady method set marker click event over google map.
|
1 |
googleMap.setOnMyLocationButtonClickListener(this); |
3. The below method is used to get current location and update blue dot.
|
1 2 3 4 5 |
@Override public boolean onMyLocationButtonClick() { Log.e(TAG, "onMyLocationButtonClick"); return false; } |
Till here we are all done with google maps integration. Now lets look upon Google API Client and Location Updates.
Set Up a Location Request
Check Location Request Tutorial for showing location alert dialog whenever GPS goes off.
To store parameters for requests to the fused location provider, create a LocationRequest. The parameters determine the level of accuracy for location requests.
|
1 2 3 4 |
LocationRequest mLocationRequest = new LocationRequest(); mLocationRequest.setPriority(LocationRequest.PRIORITY_HIGH_ACCURACY); mLocationRequest.setInterval(30 * 1000); mLocationRequest.setFastestInterval(5 * 1000); |
The meaning of code lines that used above is :
- setInterval() : This method sets the rate in milliseconds at which your app prefers to receive location updates. Note that the location updates may be faster than this rate if another app is receiving updates at a faster rate, or slower than this rate, or there may be no updates at all.
- setFasterInterval() : This method sets the fastest rate in milliseconds at which your app can handle location updates. You need to set this rate because other apps also affect the rate at which updates are sent. The Google Play services location APIs send out updates at the fastest rate that any app has requested with
setInterval(). If this rate is faster than your app can handle, you may encounter problems with UI flicker or data overflow. To prevent this, callsetFastestInterval()to set an upper limit to the update rate. - setPriority() : This method sets the priority of the request, which gives the Google Play services location services a strong hint about which location sources to use. The following values are supported:
PRIORITY_BALANCED_POWER_ACCURACY– Use this setting to request location precision to within a city block, which is an accuracy of approximately 100 meters. This is considered a coarse level of accuracy, and is likely to consume less power.PRIORITY_HIGH_ACCURACY– Use this setting to request the most precise location possible. With this setting, the location services are more likely to use GPS to determine the location.PRIORITY_LOW_POWER– Use this setting to request city-level precision, which is an accuracy of approximately 10 kilometers. This is considered a coarse level of accuracy, and is likely to consume less power.PRIORITY_NO_POWER– Use this setting if you need negligible impact on power consumption, but want to receive location updates when available. With this setting, your app does not trigger any location updates, but receives locations triggered by other apps.
The priority of PRIORITY_HIGH_ACCURACY, combined with the ACCESS_FINE_LOCATION permission setting that you’ve defined in the app manifest, and a fast update interval of 5000 milliseconds (5 seconds), causes the fused location provider to return location updates that are accurate to within a few feet. This approach is appropriate for mapping apps that display the location in real time.
Receiving Location Update
1. For getting location update we need to add google location dependency in build.gradle file.
|
1 |
compile 'com.google.android.gms:play-services-location:9.4.0' |
2. Now implement LocationListener interface to your activity.
|
1 2 3 4 5 6 7 8 9 |
public class MainActivity extends AppCompatActivity implements LocationListener{ @Override protected void onCreate(Bundle savedInstanceState) { super.onCreate(savedInstanceState); ... } } |
3. On implementing LocationListener you will get this method that will return changed Location.
|
1 2 3 4 |
@Override public void onLocationChanged(Location location) { Log.e(TAG, "Location Changed : " + location.getLatitude() + ", " + location.getLongitude()); } |
3. Add GoogleApiClient call backs to your activity that are used to help in starting location update and stopping location update.
|
1 2 3 4 5 6 7 8 |
public class MainActivity extends AppCompatActivity implements GoogleApiClient.ConnectionCallbacks, GoogleApiClient.OnConnectionFailedListener { @Override protected void onCreate(Bundle savedInstanceState) { super.onCreate(savedInstanceState); } } |
4. Build and Connect API Client in your onResume method.
|
1 2 3 4 5 6 7 8 9 10 11 |
/* Initiate Google API Client */ private void initGoogleAPIClient() { Log.e(TAG, "Init google api client"); //Without Google API Client Auto Location Dialog will not work mGoogleApiClient = new GoogleApiClient.Builder(MainActivity.this) .addConnectionCallbacks(this) .addOnConnectionFailedListener(this) .addApi(LocationServices.API) .build(); mGoogleApiClient.connect(); } |
5. Inside onConnected method get user last know location (optional if needed) and start getting location update.
|
1 2 3 4 5 6 7 8 9 10 11 12 13 14 15 16 17 18 19 20 |
@Override public void onConnected(@Nullable Bundle bundle) { Location mLocation = LocationServices.FusedLocationApi.getLastLocation( mGoogleApiClient);//getting last know location if (mLocation != null) { //Last known location got } } //Start Location Update on successful connection startLocationUpdates(); } protected void startLocationUpdates() { LocationServices.FusedLocationApi.requestLocationUpdates( mGoogleApiClient, mLocationRequest, this); } |
6. API Clients failed and suspended callbacks.
|
1 2 3 4 5 6 7 8 9 |
@Override public void onConnectionSuspended(int i) { Log.e(TAG, "onConnectionSuspended"); } @Override public void onConnectionFailed(@NonNull ConnectionResult connectionResult) { Log.e(TAG, "onConnectionFailed"); } |
7. When activity status goes to onPause then stop getting location updates.
|
1 2 3 4 5 6 7 8 9 10 11 12 13 14 15 |
@Override protected void onPause() { super.onPause(); //On Pause stop Location Update Log.e(TAG, "onPause stopLocationUpdates"); if (mGoogleApiClient != null && mGoogleApiClient.isConnected()) stopLocationUpdates(); } //Stop Location Update Method protected void stopLocationUpdates() { Log.e(TAG, "stopLocationUpdates"); LocationServices.FusedLocationApi.removeLocationUpdates( mGoogleApiClient, this); } |
8. When activity status goes to onStop disconnect the api client.
|
1 2 3 4 5 6 7 8 |
protected void onStop() { //On Stop disconnect Api Client if (mGoogleApiClient != null) { Log.e(TAG, "onStop disconnect api client"); mGoogleApiClient.disconnect(); } super.onStop(); } |
Full MainActivity.java Code
Below is the full code of MainActivity.java code. Apart from all the above steps we need to check two things first:
- Location Permission is granted or not. (only marshmallow devices).
- Check if GPS is enabled or disabled.
|
1 2 3 4 5 6 7 8 9 10 11 12 13 14 15 16 17 18 19 20 21 22 23 24 25 26 27 28 29 30 31 32 33 34 35 36 37 38 39 40 41 42 43 44 45 46 47 48 49 50 51 52 53 54 55 56 57 58 59 60 61 62 63 64 65 66 67 68 69 70 71 72 73 74 75 76 77 78 79 80 81 82 83 84 85 86 87 88 89 90 91 92 93 94 95 96 97 98 99 100 101 102 103 104 105 106 107 108 109 110 111 112 113 114 115 116 117 118 119 120 121 122 123 124 125 126 127 128 129 130 131 132 133 134 135 136 137 138 139 140 141 142 143 144 145 146 147 148 149 150 151 152 153 154 155 156 157 158 159 160 161 162 163 164 165 166 167 168 169 170 171 172 173 174 175 176 177 178 179 180 181 182 183 184 185 186 187 188 189 190 191 192 193 194 195 196 197 198 199 200 201 202 203 204 205 206 207 208 209 210 211 212 213 214 215 216 217 218 219 220 221 222 223 224 225 226 227 228 229 230 231 232 233 234 235 236 237 238 239 240 241 242 243 244 245 246 247 248 249 250 251 252 253 254 255 256 257 258 259 260 261 262 263 264 265 266 267 268 269 270 271 272 273 274 275 276 277 278 279 280 281 282 283 284 285 286 287 288 289 290 291 292 293 294 295 296 297 298 299 300 301 302 303 304 305 306 307 308 309 310 311 312 313 314 315 316 317 318 319 320 321 322 323 324 325 326 327 328 329 330 331 332 333 334 335 336 337 338 339 340 341 342 343 344 345 346 347 348 349 350 351 352 353 354 355 356 357 358 359 360 361 362 363 364 365 366 367 368 369 370 371 372 373 374 375 376 377 378 379 380 381 382 383 384 385 386 387 388 389 390 391 392 393 394 395 396 397 398 399 400 401 402 403 404 405 406 407 408 409 410 411 412 413 414 415 416 417 418 419 420 421 422 423 424 425 426 427 428 429 430 431 432 433 434 435 436 437 438 439 440 441 442 443 444 445 446 447 448 449 450 451 452 453 454 455 456 457 458 459 460 461 462 463 464 465 466 467 468 469 470 471 472 473 474 475 476 477 478 479 480 481 482 483 484 485 486 |
package com.googlemap_demo; import android.content.Intent; import android.content.IntentSender; import android.content.pm.PackageManager; import android.location.Location; import android.os.Build; import android.os.Bundle; import android.support.annotation.NonNull; import android.support.annotation.Nullable; import android.support.v4.app.ActivityCompat; import android.support.v4.content.ContextCompat; import android.support.v7.app.AppCompatActivity; import android.support.v7.widget.AppCompatTextView; import android.support.v7.widget.Toolbar; import android.util.Log; import android.view.View; import android.widget.Toast; import com.google.android.gms.common.ConnectionResult; import com.google.android.gms.common.api.GoogleApiClient; import com.google.android.gms.common.api.PendingResult; import com.google.android.gms.common.api.ResultCallback; import com.google.android.gms.common.api.Status; import com.google.android.gms.location.LocationListener; import com.google.android.gms.location.LocationRequest; import com.google.android.gms.location.LocationServices; import com.google.android.gms.location.LocationSettingsRequest; import com.google.android.gms.location.LocationSettingsResult; import com.google.android.gms.location.LocationSettingsStates; import com.google.android.gms.location.LocationSettingsStatusCodes; import com.google.android.gms.maps.CameraUpdateFactory; import com.google.android.gms.maps.GoogleMap; import com.google.android.gms.maps.OnMapReadyCallback; import com.google.android.gms.maps.SupportMapFragment; import com.google.android.gms.maps.model.BitmapDescriptorFactory; import com.google.android.gms.maps.model.LatLng; import com.google.android.gms.maps.model.Marker; import com.google.android.gms.maps.model.MarkerOptions; public class MainActivity extends AppCompatActivity implements View.OnClickListener, OnMapReadyCallback, GoogleMap.OnMarkerClickListener, GoogleApiClient.ConnectionCallbacks, GoogleApiClient.OnConnectionFailedListener, LocationListener, GoogleMap.OnMyLocationButtonClickListener { private static final String TAG = MainActivity.class.getSimpleName(); private static final int REQUEST_CHECK_SETTINGS = 0x1; private static GoogleApiClient mGoogleApiClient; private static final int ACCESS_FINE_LOCATION_INTENT_ID = 3; private AppCompatTextView normalMap, hybridMap, satelliteMap, terrainMap, noneMap; private AppCompatTextView locationLabel; /* Required for Google Maps */ private GoogleMap googleMap; private LocationRequest mLocationRequest; private Marker mMarker; private Location mLocation; @Override protected void onCreate(Bundle savedInstanceState) { super.onCreate(savedInstanceState); setContentView(R.layout.activity_main); setUpToolbar(); setUpGoogleMap();//Set Up Map findViews(); setClickListeners(); } //Set Up toolbar private void setUpToolbar() { Toolbar toolbar = (Toolbar) findViewById(R.id.toolbar); setSupportActionBar(toolbar); } //find all views private void findViews() { normalMap = (AppCompatTextView) findViewById(R.id.normal_map); hybridMap = (AppCompatTextView) findViewById(R.id.hybrid_map); satelliteMap = (AppCompatTextView) findViewById(R.id.satellite_map); terrainMap = (AppCompatTextView) findViewById(R.id.terrain_map); noneMap = (AppCompatTextView) findViewById(R.id.none_map); locationLabel = (AppCompatTextView) findViewById(R.id.current_location_label); } //set click listeners over required textviews private void setClickListeners() { normalMap.setOnClickListener(this); hybridMap.setOnClickListener(this); satelliteMap.setOnClickListener(this); terrainMap.setOnClickListener(this); noneMap.setOnClickListener(this); } /* Set Up google map if Google Play Services Exists */ private void setUpGoogleMap() { if (new GooglePlayServiceCheck().isGooglePlayInstalled(MainActivity.this)) { SupportMapFragment map = ((SupportMapFragment) getSupportFragmentManager().findFragmentById(R.id.map)); map.getMapAsync(this);//after getting map call async method, this method will call onMapReady(GoogleMap map) method } } @Override public void onMapReady(GoogleMap map) { //When map ready googleMap = map; googleMap.getUiSettings().setZoomControlsEnabled(true);//enable zoom controls googleMap.getUiSettings().setAllGesturesEnabled(true);//enable all gestures googleMap.getUiSettings().setScrollGesturesEnabled(true); /*The below setting is used for showing navigation and map toolbar on marker click, set false if you don't want show map toolbar else leave it by default it is true */ googleMap.getUiSettings().setMapToolbarEnabled(true); //Enable current Location buttons enableCurrentLocationButton(); /* Set Click listener for Marker and MyLocationButton Click event*/ googleMap.setOnMarkerClickListener(this); googleMap.setOnMyLocationButtonClickListener(this); //By default set Normal Map setMapType(MapType.NORMAL); } private void enableCurrentLocationButton() { //before further proceed check if google map is null or not because this method is calling after giving permission if (googleMap != null) { if (ContextCompat.checkSelfPermission(MainActivity.this, android.Manifest.permission.ACCESS_FINE_LOCATION) != PackageManager.PERMISSION_GRANTED) requestLocationPermission(); else { googleMap.getUiSettings().setMyLocationButtonEnabled(true);//enable Location button, if you don't want MyLocationButton set it false googleMap.setMyLocationEnabled(true);//enable blue dot } } } /* Initiate Google API Client */ private void initGoogleAPIClient() { Log.e(TAG, "Init google api client"); //Without Google API Client Auto Location Dialog will not work mGoogleApiClient = new GoogleApiClient.Builder(MainActivity.this) .addConnectionCallbacks(this) .addOnConnectionFailedListener(this) .addApi(LocationServices.API) .build(); mGoogleApiClient.connect(); } /* Check Location Permission for Marshmallow Devices */ private void checkPermissions() { if (Build.VERSION.SDK_INT >= 23) { if (ContextCompat.checkSelfPermission(MainActivity.this, android.Manifest.permission.ACCESS_FINE_LOCATION) != PackageManager.PERMISSION_GRANTED) requestLocationPermission(); else showSettingDialog(); } else showSettingDialog(); } /* Show Popup to access Location Permission */ private void requestLocationPermission() { if (ActivityCompat.shouldShowRequestPermissionRationale(MainActivity.this, android.Manifest.permission.ACCESS_FINE_LOCATION)) { ActivityCompat.requestPermissions(MainActivity.this, new String[]{android.Manifest.permission.ACCESS_FINE_LOCATION}, ACCESS_FINE_LOCATION_INTENT_ID); } else { ActivityCompat.requestPermissions(MainActivity.this, new String[]{android.Manifest.permission.ACCESS_FINE_LOCATION}, ACCESS_FINE_LOCATION_INTENT_ID); } } /* Show Location Access Dialog */ private void showSettingDialog() { mLocationRequest = LocationRequest.create(); mLocationRequest.setPriority(LocationRequest.PRIORITY_HIGH_ACCURACY);//Setting priotity of Location request to high mLocationRequest.setInterval(30 * 1000);//after 30sec the location will update mLocationRequest.setFastestInterval(5 * 1000);//5 sec Time interval LocationSettingsRequest.Builder builder = new LocationSettingsRequest.Builder() .addLocationRequest(mLocationRequest); builder.setAlwaysShow(true); //this is the key ingredient to show dialog always when GPS is off PendingResult<LocationSettingsResult> result = LocationServices.SettingsApi.checkLocationSettings(mGoogleApiClient, builder.build()); result.setResultCallback(new ResultCallback<LocationSettingsResult>() { @Override public void onResult(LocationSettingsResult result) { final Status status = result.getStatus(); final LocationSettingsStates state = result.getLocationSettingsStates(); switch (status.getStatusCode()) { case LocationSettingsStatusCodes.SUCCESS: // All location settings are satisfied. The client can initialize location // requests here. //getOriginLatLng(); break; case LocationSettingsStatusCodes.RESOLUTION_REQUIRED: // Location settings are not satisfied. But could be fixed by showing the user // a dialog. try { // Show the dialog by calling startResolutionForResult(), // and check the result in onActivityResult(). status.startResolutionForResult(MainActivity.this, REQUEST_CHECK_SETTINGS); } catch (IntentSender.SendIntentException e) { e.printStackTrace(); // Ignore the error. } break; case LocationSettingsStatusCodes.SETTINGS_CHANGE_UNAVAILABLE: // Location settings are not satisfied. However, we have no way to fix the // settings so we won't show the dialog. break; } } }); } @Override protected void onResume() { super.onResume(); //On Resume check if google api is not null and is connected so that location update should start again if (mGoogleApiClient != null && mGoogleApiClient.isConnected()) { Log.e(TAG, "onResume api client connect"); startLocationUpdates(); } else { //else if not connected or null initiate api client initGoogleAPIClient(); Log.e(TAG, "onResume init api client"); } //If location is not null set the last know location if (mLocation != null) { Log.e(TAG, "onResume update marker if location not null"); updateCurrentMarker(new LatLng(mLocation.getLatitude(), mLocation.getLongitude())); } //Check Location permission checkPermissions(); } protected void onStop() { //On Stop disconnect Api Client if (mGoogleApiClient != null) { Log.e(TAG, "onStop disconnect api client"); mGoogleApiClient.disconnect(); } super.onStop(); } @Override public void onClick(View view) { switch (view.getId()) { case R.id.normal_map: setMapType(MapType.NORMAL); break; case R.id.hybrid_map: setMapType(MapType.HYBRID); break; case R.id.satellite_map: setMapType(MapType.SATELLITE); break; case R.id.terrain_map: setMapType(MapType.TERRAIN); break; case R.id.none_map: setMapType(MapType.NONE); break; } } /* Set Map Type on basis of MapType Enum and highlight selected TextView */ private void setMapType(MapType mapType) { switch (mapType) { case NORMAL: googleMap.setMapType(GoogleMap.MAP_TYPE_NORMAL); normalMap.setTextColor(getResources().getColor(R.color.teal)); setDefaultColorBack(new AppCompatTextView[]{hybridMap, satelliteMap, terrainMap, noneMap}); break; case HYBRID: googleMap.setMapType(GoogleMap.MAP_TYPE_HYBRID); hybridMap.setTextColor(getResources().getColor(R.color.teal)); setDefaultColorBack(new AppCompatTextView[]{normalMap, satelliteMap, terrainMap, noneMap}); break; case SATELLITE: googleMap.setMapType(GoogleMap.MAP_TYPE_SATELLITE); satelliteMap.setTextColor(getResources().getColor(R.color.teal)); setDefaultColorBack(new AppCompatTextView[]{hybridMap, normalMap, terrainMap, noneMap}); break; case TERRAIN: googleMap.setMapType(GoogleMap.MAP_TYPE_TERRAIN); terrainMap.setTextColor(getResources().getColor(R.color.teal)); setDefaultColorBack(new AppCompatTextView[]{hybridMap, satelliteMap, normalMap, noneMap}); break; case NONE: googleMap.setMapType(GoogleMap.MAP_TYPE_NONE); noneMap.setTextColor(getResources().getColor(R.color.teal)); setDefaultColorBack(new AppCompatTextView[]{hybridMap, satelliteMap, terrainMap, normalMap}); break; } } /* Turn Selected TextView color back to Black when MapType changes */ private void setDefaultColorBack(AppCompatTextView[] views) { for (AppCompatTextView v : views) v.setTextColor(getResources().getColor(android.R.color.black)); } @Override public void onConnected(@Nullable Bundle bundle) { //On API Client Connection check if location permission is granted or not if (ContextCompat.checkSelfPermission(MainActivity.this, android.Manifest.permission.ACCESS_FINE_LOCATION) != PackageManager.PERMISSION_GRANTED) requestLocationPermission(); else { //If granted then get last know location and update the location label if last know location is not null Log.e(TAG, "onConnected get last know location"); mLocation = LocationServices.FusedLocationApi.getLastLocation( mGoogleApiClient); if (mLocation != null) { Log.e(TAG, "onConnected get last know location not null"); locationLabel.setText(String.format(getResources().getString(R.string.lat_lng), mLocation.getLatitude(), mLocation.getLongitude())); } else Log.e(TAG, "onConnected get last know location null"); } //Start Location Update on successful connection startLocationUpdates(); } /* Start Location Update */ protected void startLocationUpdates() { Log.e(TAG, "startLocationUpdates"); if (ContextCompat.checkSelfPermission(MainActivity.this, android.Manifest.permission.ACCESS_FINE_LOCATION) != PackageManager.PERMISSION_GRANTED) requestLocationPermission(); else LocationServices.FusedLocationApi.requestLocationUpdates( mGoogleApiClient, mLocationRequest, this); } //Handle API Client Connection Suspended @Override public void onConnectionSuspended(int i) { Log.e(TAG, "onConnectionSuspended"); } //Handle API Client Connection Failed @Override public void onConnectionFailed(@NonNull ConnectionResult connectionResult) { Log.e(TAG, "onConnectionFailed"); } //Handle Marker click event @Override public boolean onMarkerClick(Marker marker) { Log.e(TAG, "Marker Click: " + marker.getTitle() + "\nLocation : " + marker.getPosition()); return false; } //On Location change method @Override public void onLocationChanged(Location location) { Log.e(TAG, "Location Changed : " + location.getLatitude() + ", " + location.getLongitude()); mLocation = location; //Update Location label text locationLabel.setText(String.format(getResources().getString(R.string.lat_lng), location.getLatitude(), location.getLongitude())); //Update map marker on location change updateCurrentMarker(new LatLng(location.getLatitude(), location.getLongitude())); } //Update current marker of map private void updateCurrentMarker(LatLng latLng) { if (mMarker == null) { Log.e(TAG, "updateCurrentMarker marker null"); if (googleMap != null) { Log.e(TAG, "updateCurrentMarker google map not null"); //Set Marker position and default Icon mMarker = googleMap.addMarker(new MarkerOptions().position(latLng) .icon(BitmapDescriptorFactory.defaultMarker(BitmapDescriptorFactory.HUE_CYAN))); //If you want to set Custom Icon then uncomment below line and comment above lines // mMarker = googleMap.addMarker(new MarkerOptions().position(latLng).icon(BitmapDescriptorFactory.fromResource(R.drawable.ic_user_location))); mMarker.setTitle("You are here");//set Marker title googleMap.animateCamera(CameraUpdateFactory.newLatLngZoom(latLng, 17.0f));//animate camera to 17 float value } else Log.e(TAG, "updateCurrentMarker google map null"); } else { //If marker is already there just update position Log.e(TAG, "updateCurrentMarker marker not null"); mMarker.setPosition(latLng); //if you want to animate camera to updated location, then uncomment below line // googleMap.animateCamera(CameraUpdateFactory.newLatLngZoom(latLng, 17.0f)); } } @Override protected void onActivityResult(int requestCode, int resultCode, Intent data) { switch (requestCode) { // Check for the integer request code originally supplied to startResolutionForResult(). case REQUEST_CHECK_SETTINGS: switch (resultCode) { case RESULT_OK: //If result is OK then start location Update startLocationUpdates(); break; case RESULT_CANCELED: //else show toast Toast.makeText(this, R.string.location_access_denied, Toast.LENGTH_SHORT).show(); break; } break; } } /* On Request permission method to check the permisison is granted or not for Marshmallow+ Devices */ @Override public void onRequestPermissionsResult(int requestCode, @NonNull String[] permissions, @NonNull int[] grantResults) { super.onRequestPermissionsResult(requestCode, permissions, grantResults); switch (requestCode) { case ACCESS_FINE_LOCATION_INTENT_ID: { // If request is cancelled, the result arrays are empty. if (grantResults.length > 0 && grantResults[0] == PackageManager.PERMISSION_GRANTED) { //If permission granted show location dialog if APIClient is not null if (mGoogleApiClient == null) { initGoogleAPIClient(); showSettingDialog(); } else showSettingDialog(); //enable MyLocationButton enableCurrentLocationButton(); } else { Toast.makeText(MainActivity.this, R.string.permission_denied, Toast.LENGTH_SHORT).show(); // permission denied } return; } } } @Override protected void onPause() { super.onPause(); //On Pause stop Location Update Log.e(TAG, "onPause stopLocationUpdates"); if (mGoogleApiClient != null && mGoogleApiClient.isConnected()) stopLocationUpdates(); } //Stop Location Update Method protected void stopLocationUpdates() { Log.e(TAG, "stopLocationUpdates"); LocationServices.FusedLocationApi.removeLocationUpdates( mGoogleApiClient, this); } //Handle MyLocationButton click event @Override public boolean onMyLocationButtonClick() { Log.e(TAG, "onMyLocationButtonClick"); return false; } } |
Finally, all set up. Run your code and see the magic of google maps. Now integrate google map to create location based applications.
Thanks. 🙂
2 Comments
Bhushan
Wednesday, September 14th, 2016awesome tutorial. love reading ur blog every time.. keep it up 🙂
Hori Revens
Tuesday, June 6th, 2017Thanks for your complete tutorial. I can learn more about Google Maps on Android 🙂